
Journal
Best Resin Miniatures for Display: 2026 Collector's Guide
Find the best resin miniatures for display in 2026. Compare detail, durability, and pricing across statues and packs, then learn to paint and protect them.
Table of Contents
- What Separates Display Resin Miniatures From Tabletop Models
- Quick Comparison: Display Resin Miniatures at a Glance
- Our Top Picks: Best Resin Miniatures for Display
- How to Paint Display Miniatures for a Cleaner Finish
- Display Case Ideas for Miniatures That Prevent Damage
- Resin Miniature Maintenance Tips for Long-Term Display
- Frequently Asked Questions
Last Updated: September 18, 2026
What Separates Display Resin Miniatures From Tabletop Models
Display resin miniatures are figures chosen and finished for a shelf rather than a game table, which changes what matters most when you buy them. Tabletop models must survive handling and repeated play; display pieces must look right from every angle and hold fine detail for years.
Quick Comparison: Display Resin Miniatures at a Glance
The table below maps every piece in this guide to its price, format, and best display use.
| Piece | Price | Format | Best For |
|---|---|---|---|
| Xenomorph Statue | $45.00 | Single statue | Horror centerpiece, shelf focal point |
| Coco Statue | $45.00 | Single statue | Fantasy display, intricate base detail |
| Ellie Statue | $45.00 | Diorama statue | Narrative scene display, action pose |
| Helldivers Pack | $100.00 | Squad miniatures | Wargaming shelf, army display |
| Helldivers Bug Pack | $75.00 | Creature miniatures | Contrast display against armored squads |
| Halo 3 Master Chief Pack | $75.00 | Squad miniatures | Sci-fi collection, armored poses |
| NCR Ranger Pack | $100.00 | Squad miniatures | Post-apocalyptic display, Fallout fans |
| Adventure Time Orks | $70.00 | Character pack | Colorful shelf display, gift piece |
| Halo Grunt | $15.00 | Single miniature | Entry point, accent figure |
| Brute Pack | $150.00 | Large squad | Statement display, bulk collection |
Our Top Picks: Best Resin Miniatures for Display
These are the pieces worth building a shelf around, ranked by how well they hold up as display objects.

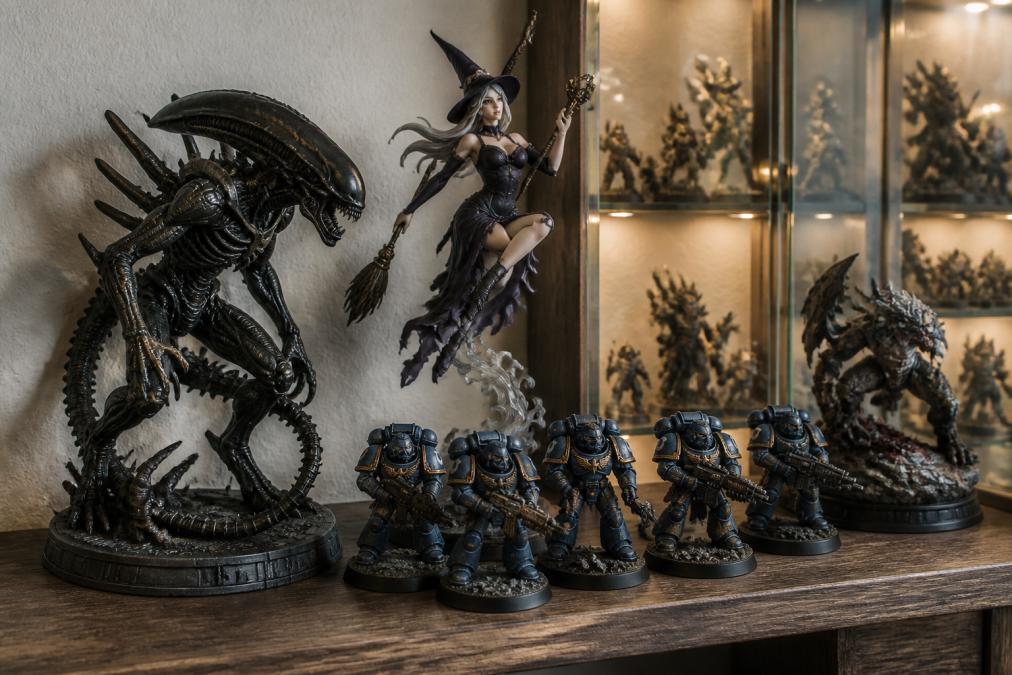
Xenomorph, Coco, and Ellie: Bulkamancer and H3llcreator Statues
The Xenomorph statue is the strongest pure display piece in the lineup at $45.00. The creature coils atop a biotechnic pillar, its elongated crown arching over bared inner jaws, with a segmented tail sweeping a full ring around the crouch and eggs clustered at the pillar's foot. Sculpted by Bulkamancer, this is a piece where support structure and surface finish decide how clean the final paint job looks.
Halo and Helldivers Packs: Galactic Armory Wargaming Miniatures
Squad packs give you more figures per dollar and display well as a ranked line rather than a single centerpiece. The Halo 3 Master Chief Pack runs $75.00 and includes detailed miniatures for your wargaming campaigns, sculpted by Galactic Armory. The Brute Pack, at $150.00, is the largest armored set here and works as a statement display.
Fallout and Adventure Time: Character Packs for Shelf Display
The NCR Ranger Pack, $100.00, brings Fallout's post-apocalyptic look to the shelf, with the muted, weathered palette that suits a matte finish and rewards careful drybrushing. Adventure Time Orks, $70.00, sits at the opposite end: bright, playful, and a natural gift piece for someone who wants color rather than grit.
How to Paint Display Miniatures for a Cleaner Finish
A clean display finish comes down to prep and thin coats, not expensive paint. But resin behaves differently from plastic or metal, and the difference shows up months later. Most disappointing paint jobs trace back to skipped steps before the brush ever touches resin.
Why resin is the hardest common material to paint
Polystyrene plastic has a slightly porous, solvent-softened surface that paint keys into, and metal takes primer well. Photopolymer resin cures to a hard, glassy, low-surface-energy skin, exactly why it captures micro-detail so well, and exactly why acrylic struggles to grip it. Primer adhesion is not a formality on resin; it is the load-bearing step.
Step 1: Wash off mold release
Unpainted resin can carry mold release residue, and paint will bead or flake anywhere it remains. Warm water with mild dish soap and a soft toothbrush handles it; work into recesses and under overhangs where release agent pools. Rinse thoroughly and dry completely, overnight is safer than an hour, because water trapped in a hollow base or under a cape will ruin a primer coat.
Step 2: Prime for tooth, not for color
The goal of primer on resin is a microscopic rough surface the acrylic can mechanically lock into. Two routes:
- Rattlecan primer (a fine-detail hobby primer, not general-purpose hardware primer): spray in short passes from a consistent distance, letting each pass flash off before the next. Heavy single coats fill the micro-details you paid for.
- Airbrush primer: more control, thinner coats, and the better choice on a $45.00 statue with an ornate base like Coco, where a rattlecan can pool in the tiny village and stone-path details.
Step 3: Match your paint system to the resin
Acrylics are the default for display work because they are water-cleanup, low-odor, and layer predictably, but thin acrylics need a good primer to hold. Two notes for resin:
- Thin with water or a dedicated acrylic medium, not straight from the pot. Build color across several passes. Thick single coats fill in the micro-details.
- Let each layer cure fully before the next. Acrylic that is dry to the touch is not cured, and painting over a half-cured layer can lift it.
Step 4: Shade, highlight, then seal
Once the base layers are down, let washes settle into recesses to define detail, then drybrush or edge-highlight raised surfaces. The final step is the one collectors most often skip: a matte varnish. Varnish is not just a finish choice, it is a sacrificial layer that takes handling and dusting stress instead of your paint, the difference between a figure that still looks finished after years and one with shiny worn edges.
Xenomorph - Highly Detailed Statue →
- Wash: remove mold release with soap and water, dry fully
- Prime: thin, even coats for a tooth the paint can bond to
- Base: thin layers, built up, never one heavy pass
- Shade: let washes settle into recesses to define detail
- Highlight: drybrush or edge-highlight raised surfaces
- Seal: a matte varnish locks the finish and slows UV damage
Display Case Ideas for Miniatures That Prevent Damage
Display case ideas for miniatures should solve three problems at once: dust, UV light, and physical knocks. Dust is the slow enemy, settling into recesses and dulling highlights. But the damage that actually ends a display piece's life is light, and most collectors underestimate how much comes through a window.
The real risk: UV degradation and yellowing
Cured photopolymer resin is not inert. Under ultraviolet light, the polymer chains continue to react, and the visible result is yellowing, a warm cast that creeps across white, cream, and pale gray surfaces first, because those colors have the least pigment to mask it. A figure that looked crisp on day one can read as dingy after a few summers on a sunlit shelf.
Two things drive the rate:
- Direct sunlight is far more damaging than indoor bulbs. Even an hour of direct sun per day adds up over years.
- Heat accelerates the reaction. A shelf above a radiator or in a hot garage is a worse home for resin than a cool interior wall, even if both are out of the sun.
Choosing glazing that actually filters UV
Not all clear panels are equal, and "glass" is not automatically protective.
- Standard clear glass blocks some UV but not all, and it offers no protection against the heat load of direct sun.
- Acrylic (plexiglass) panels are lighter and shatter-resistant, which matters for a tall cabinet, but plain acrylic does not filter UV on its own.
- UV-filtering acrylic is the practical upgrade. It is sold as a sheet or as a cabinet door panel, and it is the single most effective change you can make for a piece that must live in a bright room.
Dust and knock protection
A closed cabinet with glass or acrylic doors handles dust and knocks together. For open shelving, add a riser so figures sit back from the shelf edge where a sleeve or dropped object can catch them, and use felt or foam pads under bases to cut vibration when a door closes or a shelf is bumped.
A simple setup by budget
- Closed cabinet with UV-filtering acrylic doors: best dust, knock, and UV protection; the right call for a centerpiece statue
- Open shelf plus riser, out of direct sun: cheaper, still keeps figures back from edges and away from the window
- UV-filtering acrylic panel in front of an open shelf: the middle option for a bright room
- Tiered risers: keep small figures visible next to large ones and lift them off the dustiest surface
Resin Miniature Maintenance Tips for Long-Term Display
Resin miniature maintenance tips come down to handling, dusting, and storage, done consistently rather than occasionally. A display piece that never gets touched still degrades slowly from light, dust, and temperature swings.
Frequently Asked Questions
What makes resin miniatures suitable for display versus gaming?
Display resin miniatures are judged on detail and surface finish, not durability under handling. Higher pixel resolution and tighter layer heights capture micro-details like facial expressions, fabric folds, and base scenery. Gaming models need impact resistance and flexibility because they get knocked around. If a piece is going on a shelf, prioritize detail and primer adhesion; if it is going on a table, prioritize toughness.
How do I properly prepare resin miniatures for a display case?
Wash the model in warm water with mild soap to remove mold release, then let it dry fully. Sand away support nubs with fine grit, fill gaps with putty, and prime with a thin coat that bonds to resin. Once painted and sealed with a matte varnish, place the model on a stable shelf away from direct sunlight to slow yellowing and prevent warping.
How should I store resin miniatures to prevent warping or yellowing?
Keep them out of direct sunlight and away from heat sources like radiators or windowsills. UV light breaks down the photopolymer over time, causing yellowing and brittleness. Store models in a closed cabinet or a case with UV-filtering glass. For long-term storage, wrap pieces in acid-free tissue and keep them in a cool, dry room. Avoid stacking heavy models on top of delicate parts.
What is the difference between standard resin and high-detail display resin?
Standard resin balances cure speed and toughness, so it works well for gaming pieces that get handled. High-detail display resin has lower viscosity and finer pigment dispersion, which lets it capture thinner layer lines and sharper micro-details. It also tends to be more brittle. For display statues, the sharper surface finish is usually worth the trade-off in durability.
How do I identify high-quality sculpts for my display collection?
Look for crisp undercuts, clean support marks, and consistent wall thickness. A good sculpt shows distinct micro-details on faces, hands, and gear rather than soft blobs. Check that bases sit flat and that no layer lines are visible after priming. If you can inspect a painted example, look at how the primer adhered and whether paint sits smoothly on the surface.