
Journal
How to Paint Unpainted Gaming Miniatures: 2026 Guide
How to paint unpainted gaming miniatures: Learn how to paint gaming miniatures with essential tools, thinning tips, and beginner techniques. Get started.
Table of Contents
- Essential Miniature Painting Tools for Your First Project
- How to Thin Acrylic Paints for Miniatures Without Ruining Consistency
- Miniature Painting Techniques for Beginners: Base, Wash, and Layer
- Priming and Surface Preparation Before You Paint Gaming Miniatures
- Color Theory for Miniatures: Choosing a Palette That Works
- Troubleshooting Common Issues When You Paint Gaming Miniatures
- Budget vs. Pro Tools: What Actually Matters
- Frequently Asked Questions
Last Updated: September 16, 2026
Essential Miniature Painting Tools for Your First Project
You do not need a studio full of supplies to learn how to paint unpainted gaming miniatures. A focused starter kit of six or seven items covers almost everything a first project demands.
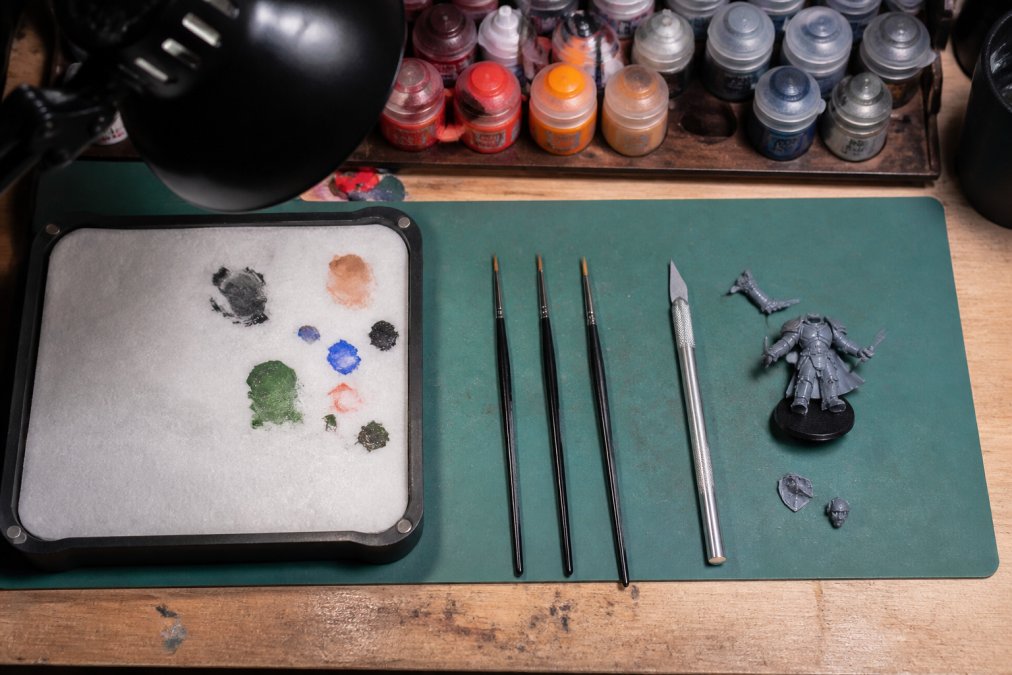
Start with these:
- Hobby knife and fine file for removing mold lines and flash from plastic, resin, or metal miniatures
- Small wire cutters for separating parts from sprues without bending them
- Synthetic brushes in three sizes: a size 2 for base coating, a size 0 for detail work, and a cheap flat brush for drybrushing
- A wet palette to keep acrylic paint workable for hours instead of minutes
- A primer made for miniature surfaces
- A matte varnish to protect the finished paint job
- A bright desk lamp so you can actually see what you are doing
Budget vs. Pro: Where Your Money Actually Changes the Result
Spending more helps in exactly three places early on, and wastes money everywhere else.
Worth upgrading early:
- Brushes. A dedicated hobby brush holds a sharp point longer than a craft-store multi-pack, which is what lets you hit eyes, straps, and edge highlights. A mid-tier synthetic in size 0 and size 2 covers 90% of beginner work.
- A wet palette. The highest-return purchase for a new painter: it keeps acrylic workable for hours, stops paint drying mid-session, and makes thinning easier. A homemade version works, but a purpose-built one seals better.
- Lighting. A daylight-balanced desk lamp (around 5000-6500K) lets you see color and detail accurately; warm bulbs hide mistakes you only notice in daylight later.
Fine to keep budget for years:
- Paint pots from entry-level ranges. Starter acrylic is perfectly adequate for tabletop work; higher tiers buy convenience and color range, not a better finish.
- Plastic palettes for dry mixing. A cheap plastic well palette is fine for mixing small amounts of a single color.
- Files, knives, and clippers. Basic versions do the same job as premium ones. Replace them when they dull, not to upgrade.
Where pro tools genuinely earn their keep:
- A detail brush kept clean and dedicated. For eyes and freehand, a brush that holds a point under pressure is the difference between a clean line and a smeared one.
- A non-yellowing matte varnish. Cheap varnish can yellow or frost over time, undoing a finished paint job, so the upgrade protects hours of work.
What You Can Skip on a First Project
You will see recommendations for an airbrush, a vortex mixer, magnifying lenses, and a full set of hobby files. None are needed to finish a first squad. An airbrush saves time once you are base coating whole armies, but its setup, cleaning, and ventilation slow a beginner down.
How to Thin Acrylic Paints for Miniatures Without Ruining Consistency
Thinning separates a smooth finish from a chalky, texture-clogged one. Aim for a consistency like skim milk: thin enough to flow off the brush, thick enough not to run into the recesses.
Here is a reliable method:
- Put a small drop of paint on your palette.
- Dip your brush in clean water and add roughly one brush-load of water to the paint.
- Mix with the brush until the paint stops holding a peak and starts to level out on its own.
- Test on your thumbnail. If the paint covers the ridge of your nail without beading up, it is ready.
Miniature Painting Techniques for Beginners: Base, Wash, and Layer
Learning how to paint unpainted gaming miniatures comes down to three techniques in sequence: base coating, washing, and layering. Master these and your miniatures look dramatically better than bare plastic.
| Technique | Purpose | Paint Consistency | Common Mistake |
|---|---|---|---|
| Base coat | Even color foundation | Skim milk | One thick coat |
| Wash | Shadow in recesses | Watery, flows freely | Flooding the whole model |
| Layer | Build highlights | Slightly thinned | Covering all the wash |
| Drybrush | Texture and edges | Nearly dry | Too much paint on brush |
Priming and Surface Preparation Before You Paint Gaming Miniatures
Preparation takes about as long as the painting itself on a first model, and skipping it is the most common reason paint chips off within a week. Primer gives acrylic something to grip, especially on smooth plastic and resin.
Safety and Ventilation: The Step Most Guides Skip
Rattle-can primer and solvent-based varnish carry real inhalation risk. Aerosol propellants and solvent vapors should not be breathed in a closed room, and the smell going away does not mean the air is clear.
Practical rules that keep a painting session safe:
- Spray outdoors or in a garage with the door open. A cracked bedroom window is not adequate airflow. If you must spray indoors, use a spray booth with a fan and filter vented outside, and still wear a respirator.
- Wear a respirator rated for organic vapors and particulates. A dust mask does not filter solvent vapor; look for cartridges labeled for paint spraying, not a simple N95.
- Wear nitrile gloves when handling solvent-based varnish and primer. Skin contact causes irritation, and gloves also keep fingerprints off a freshly primed surface.
- Let primed models cure where the air moves. A garage, covered porch, or ventilated utility room works. Bring them inside only after the solvent smell is fully gone, usually several hours.
- Store aerosol cans away from heat and never puncture or incinerate them. Follow the can's disposal instructions; many municipalities treat them as household hazardous waste.
Brush-On vs. Spray Primer: How to Choose
| Factor | Spray primer | Brush-on primer |
|---|---|---|
| Speed on a squad | Fast, one pass per angle | Slow, one model at a time |
| Ventilation needed | High (outdoors or vented booth) | Low (normal room air) |
| Control on small parts | Lower, easy to over-apply | High, precise |
| Finish | Even, slightly textured | Smooth, can show brush marks |
| Best for | Whole squads, plastic kits | Single models, resin, delicate parts, indoor painters |
A common pattern: spray-prime a whole squad outdoors on a nice day, then keep brush-on primer for touch-ups and single models the rest of the year.
Fixing a Bad Prime Job
Primer that goes on too thick fills in detail; too thin or applied in humidity, it dries chalky and dusty so paint will not adhere evenly. Both are recoverable more often than beginners think.
- Thick, detail-clogging primer: Strip it. Soak the model in hobby paint remover or isopropyl alcohol (test a hidden area first), then scrub with an old toothbrush. Do not scrape cured primer off with a knife; you will gouge the model.
- Chalky or dusty primer: This usually comes from spraying in high humidity or holding the can too far away so the primer dries in the air. Lightly sand with a fine grit, wipe clean, and apply a thin second coat in better conditions.
- Patchy coverage: Do not fix it with one heavy coat. Apply two or three thin passes, letting each flash off between them, until coverage is even.
Color Theory for Miniatures: Choosing a Palette That Works
A limited palette painted well beats a rainbow painted badly. Pick three to five colors per miniature and build every highlight and shadow from those.
Troubleshooting Common Issues When You Paint Gaming Miniatures
Paint looks chalky or grainy. Your paint is too thick or you are applying it over a partially dried layer. Thin it and let each coat dry completely.
| Problem | Likely Cause | Fix |
|---|---|---|
| Chalky texture | Paint too thick | Thin and apply more coats |
| Beading paint | Oily or unprepared surface | Clean and re-prime |
| Tide marks | Excess wash | Wick away before drying |
| Clogged detail | Thick paint in recesses | Thin paint, smaller brush |
Budget vs. Pro Tools: What Actually Matters
Spending more money helps in exactly three places: brushes, a wet palette, and lighting are worth upgrading early. Everything else can stay budget for years.
Frequently Asked Questions
Is it possible to paint miniatures without primer?
You can paint miniatures without primer, but the paint will struggle to stick to bare plastic, resin, or metal. Acrylic paint needs a surface with some texture to grip. Without primer, your base coat may bead up, rub off during handling, or look uneven. A thin coat of spray or brush-on primer takes a few minutes and gives you a reliable foundation. If you absolutely cannot prime, wash the miniature with warm soapy water and apply two thin coats of paint, but expect reduced durability.
What are the essential tools for painting gaming miniatures?
You need a synthetic or sable brush in size 0 and size 2, a primer suited to your material (plastic, resin, or metal), acrylic paints in your chosen palette, a wet palette to keep paint workable, a water cup, and paper towels. A hobby knife and fine-grit sandpaper help remove mold lines before painting. A matte varnish seals your work when finished. You do not need every tool on day one. Start with brushes, primer, paint, and a palette, then add specialty items as your skills grow.
Is a wash just watered down paint?
A wash is not simply watered-down paint. Washes contain a surfactant that breaks surface tension, letting the pigment flow into recesses and crevices instead of pooling on flat surfaces. Watered-down acrylic paint still has surface tension and will bead up or dry with tide marks. You can make a basic wash by adding a drop of dish soap and water to paint, but commercial washes are formulated to settle predictably. For beginners, a ready-made wash saves time and gives more consistent shading results.
Do I need to wash my miniatures before painting?
Washing unpainted gaming miniatures removes mold release agent, oils from your hands, and dust that prevent primer and paint from adhering. Resin and metal miniatures especially benefit from a warm soapy water bath and a soft toothbrush scrub. Plastic miniatures sometimes skip this step, but washing takes two minutes and prevents paint flaking later. Let the miniature dry completely before priming. If you notice paint beading or pulling away from edges, leftover mold release is usually the cause.